What we do here
"Pulsar" shows some animation and some tricks.
WARNING: Pulsar's visual effects may be uncomfortable or dangerous to people with certain conditions such as epilepsy. Be careful.
en
this page is part of the annotated examples.
If this is your first attempt, it may be useful to read the LiveCode Basics page first.
"Pulsar" shows some animation and some tricks.
WARNING: Pulsar's visual effects may be uncomfortable or dangerous to people with certain conditions such as epilepsy. Be careful.
Pulsar makes a circle throb on the card.
Start with a new main stack. If you have done the other examples, you should by now know how to do that.
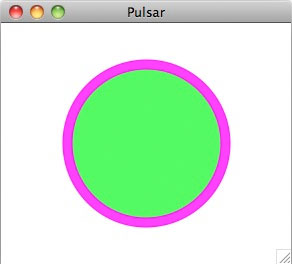
Drag an oval from the tools palette to the stack and with its property inspector set its style to "Oval" and its name to "Oval" too. Choose its colours, line style, opaqueness and so on as you like. I set the linesize to 20, made it opaque and stroked it with puplish pink and filled it with green.
Make the stack's window small and squarish, not larger than in the image above. This is important for the rest of this exercise.
Save your work in a file.
We will only have a mouse-down handler, sitting in the stack script. Type this in (or copy-paste it):
on MouseDown
put 10 into D
repeat until the mouse is up
repeat until the mouse is up
if D < the width of this card then
add 5 to D
set the width of graphic "Oval" to D
set the height of graphic "Oval" to D
set the loc of graphic "Oval" to the loc of this card
else
exit repeat
end if
end repeat
repeat until the mouse is up
if D>10 then
subtract 5 from D
set the width of graphic "Oval" to D
set the height of graphic "Oval" to D
set the loc of graphic "Oval" to the loc of this card
else
exit repeat
end if
end repeat
end repeat
end MouseDown
Note that this will not work unless you have already an oval with name "Oval" on the card.
The handler will run as soon as the mousebutton goes down with the pointer inside the stack's window. It will also stop as soon as the mouse goes up again.
There are three repeat loops in our program. The first one takes almost everything, and keeps repeating until the mouse goes up. It is preceded by the statement put 10 into D.
Inside the big loop are two smaller ones. Both of them also stop when the mouse goes up. So to run this program you have to put the mouse on top of the stack window, then hold it down to see the program work, and as soon as you release the mouse button the program will stop.
The first small loop tests if D is less than the width of the card, and if so, it increases D by a little. Then it modifies the oval graphic: it makes it into a circle by setting the width and height equal to each other, and it centres the circle by making its loc (location, centre) equal to the loc of the card (which is also the card's centre).
Each time around the loop D increases and the circle gets bigger. At some point D will be bigger than the width of the card, and the exit repeat will be executed, which terminates the first small loop.
Then the second small loop will be started (assuming the mouse button is still down). This does the inverse of the first one: it tests if D is still greater than 10, and if so it subtracts something from D before setting the circle's size. During this loop the circle will steadily shrink in size. After a while D is too small and the exit repeat will be executed.
After that we are still in the encompassing loop, so we will start again with the first small loop, which makes the circle get bigger again. The net effect is that as long as we hold the mouse button down, we will see the circle get bigger and smaller, pulsing between almost a point and the full width of the card.
Now make the stack window as big as you can. If you run the program by holding the mouse down on the window, then you will notice that the pulsing falters, sometimes stops.
That is because the loops give instructions to the LiveCode's graphics engine faster than the engine can do the drawing. We will need to slow down the loops a little to give the engine time. To do that we introduce a wait statement:
on MouseDown
put 10 into D
repeat until the mouse is up
repeat until the mouse is up
if D < the width of this card then
add 5 to D
set the width of graphic "Oval" to D
set the height of graphic "Oval" to D
set the loc of graphic "Oval" to the loc of this card
else
exit repeat
end if
wait 1 millisecond with messages
end repeat
repeat until the mouse is up
if D>10 then
subtract 5 from D
set the width of graphic "Oval" to D
set the height of graphic "Oval" to D
set the loc of graphic "Oval" to the loc of this card
else
exit repeat
end if
wait 1 millisecond with messages
end repeat
end repeat
end MouseDown
(I took out some blank lines to make things a little more compact, but that is irrelevant)
There are two forms of the wait statement: just wait and wait with messages. The difference is this: if you just wait, then everything waits, the entire LiveCode stops until the wait is over. If you wait with messages, then only the handler with the wait will stop, everything else will continue to send and receive messages, so for example the graphics will continue to work, and you could even click on buttons or do other things in parallel.
You can wait for seconds or milliseconds. In our case a single millisecond is enough.
With a large window you will notice that the circle seems to grow very slowly when it gets large. That is in fact a perception of the human brain: the circle's diameter increases by 5 pixels at each time round the loop. When it is small, say only 5 pixels across, increasing by 5 pixels will double the size, but when it is 200 pixels across, increasing to 205 pixels is only a very small increase, relatively speaking. You perceive a slowdown.
A better way therefore is to increase the diameter by a factor: multiply the diameter by a number close to 1.
In the next version I have replaced the add and subtract by multiply and divide. I used a factor of 1.1, i.e. a 10% increase. Note how that behaves very differently indeed!
on MouseDown
put 10 into D
repeat until the mouse is up
repeat until the mouse is up
if D < the width of this card then
multiply D by 1.1
set the width of graphic "Oval" to D
set the height of graphic "Oval" to D
set the loc of graphic "Oval" to the loc of this card
else
exit repeat
end if
wait 1 millisecond with messages
end repeat
repeat until the mouse is up
if D>10 then
divide D by 1.1
set the width of graphic "Oval" to D
set the height of graphic "Oval" to D
set the loc of graphic "Oval" to the loc of this card
else
exit repeat
end if
wait 1 millisecond with messages
end repeat
end repeat
end MouseDown
Remember this important feature of our human senses: we notice relative changes, not absolute ones.
Now try different factors for growing and contracting, e.g. multiply by 1.2 but divide by 1.05 and see what effect that produces.